Milk Steaming & Latte Art Basics for Home Baristas (Beginner’s Guide 2025)
Last updated: December 12, 2025

Good espresso is only half of a great cappuccino or latte. The other half is milk: properly steamed, silky, and sweet. For most beginners, milk steaming and latte art are more confusing than pulling the shot. The wand spits, the milk screams, the foam looks like dish soap bubbles, and the pattern never appears.
This guide takes you step by step through the fundamentals of milk, how to steam it correctly, and how to pour simple latte art patterns at home without professional equipment. No prior barista experience required.
1. Understanding Milk for Espresso Drinks
Before you touch the steam wand, you need to understand what milk actually does when heated. Milk foam depends on proteins for structure and fats for texture and sweetness. Different types of milk behave differently.
Whole vs. low-fat milk
- Whole milk – creamier, sweeter, easier to texture for latte art.
- Low-fat or skim milk – creates larger, drier foam; good for “airy” cappuccinos, more difficult for smooth art.
Plant-based alternatives
Many baristas use “barista edition” oat, soy, or almond milks. These are formulated to foam more like dairy and hold simple latte art shapes. Regular versions of plant milk often split, overheat, or collapse quickly.

Ideal milk temperature
Milk tastes sweetest between 55–65°C (130–150°F). Above 70°C (160°F), proteins break down, sweetness drops, and the milk develops a cooked taste. For beginners, using a simple thermometer is helpful until you learn to judge by touch.
2. Essential Tools for Milk Steaming at Home
You do not need a café-level setup to steam good milk, but a few tools make the process much more forgiving.
- Steam wand – ideally a traditional wand with a small tip, not an automatic frother.
- Metal milk pitcher – 350–600 ml (12–20 oz), with a sharp spout for latte art.
- Simple thermometer (optional) – useful until you learn heat by hand.
- Clean microfiber cloth – for wiping the steam wand immediately after steaming.

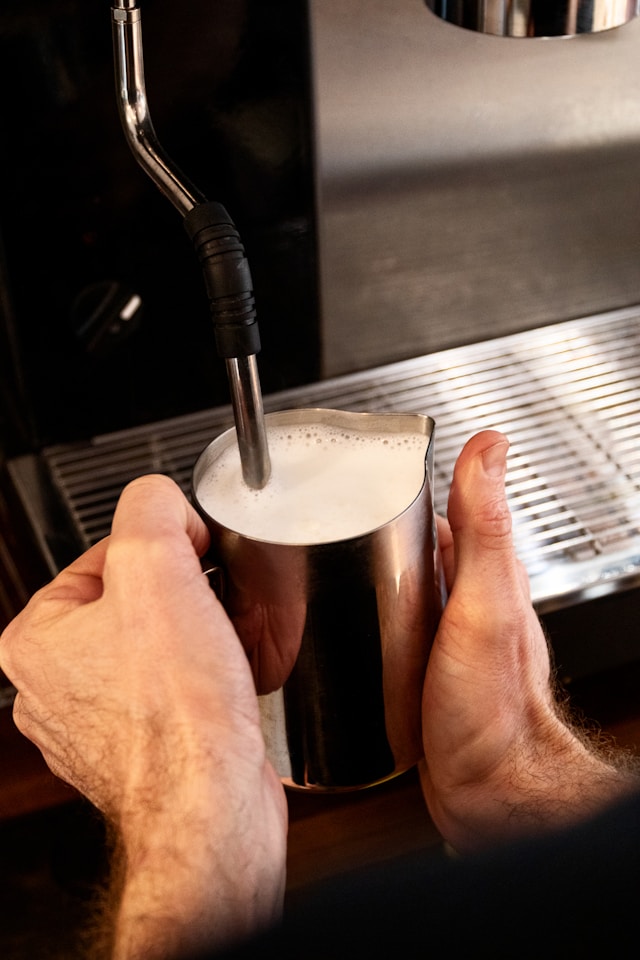
3. Step-by-Step: How to Steam Milk Correctly
Every machine is slightly different, but the core technique is the same. The goal is to create microfoam – milk with tiny, velvety bubbles that integrate fully with the liquid, not a thick layer of dry foam on top.
Step 1 – Fill the pitcher correctly
Fill the pitcher to just below where the spout starts to curve. Too much milk will overflow; too little will not give enough depth for a proper whirlpool.
Step 2 – Purge the steam wand
Open the steam briefly to purge condensation, then close it. This prevents water from shooting into your milk at the beginning.
Step 3 – Position the wand
Submerge the tip just below the surface, slightly off center. The wand should be angled to create a circular motion in the pitcher, not pointing straight down.

Step 4 – Stretching phase (adding air)
Turn on the steam. You should hear a gentle “tss-tss-tss” sound, not a scream. This is air being introduced. Keep the tip close to the surface so the milk slowly rises.
As the milk volume increases and the pitcher warms up slightly, lower the pitcher just enough to keep that gentle sound. Stop stretching when the milk feels lukewarm on the bottom of the pitcher.
Step 5 – Texturing phase (creating microfoam)
Now raise the pitcher so the steam tip sits deeper under the surface. The squeaking sound should disappear. Your goal is a stable whirlpool, rolling the milk and breaking down any larger bubbles.
Keep this whirlpool until the pitcher becomes too hot to hold comfortably for more than a second or two. If using a thermometer, stop steaming around 60–65°C (140–150°F).
Step 6 – Finishing and cleaning
- Turn off the steam before removing the wand from the milk.
- Tap the pitcher gently on the counter to burst surface bubbles.
- Swirl the milk until the surface looks glossy, like wet paint.
- Wipe the wand with a damp cloth and purge steam briefly again.

4. Common Milk Steaming Mistakes
Most beginners make the same errors. Recognizing them early saves time and wasted milk.
Too much air, too early
Loud screaming noises and giant bubbles are a sign that the wand is too close to the surface or the steam power is too high. Lower the pitcher slightly and reduce the time spent in the stretching phase.
No whirlpool
If the milk is only spinning in small circles or not moving much, adjust the angle. A strong, smooth whirlpool is what polishes the texture and breaks down bubbles.
Overheating the milk
Burnt-tasting milk ruins the drink, even if the art looks good. If you do not use a thermometer, stop steaming as soon as the pitcher becomes too hot to hold at the bottom.
Letting the milk sit too long
Microfoam separates quickly. After steaming, swirl a few seconds and pour immediately. Waiting even 30–60 seconds makes latte art much harder.
5. Espresso and Milk: Preparing the Base for Latte Art
Latte art depends on two things: a stable crema layer on the espresso and properly textured milk. If either is missing, the pattern will not form.
- Use fresh beans and a well-extracted shot with even crema.
- Avoid very tall cups while learning; smaller cappuccino cups are easier.
- Time your workflow so the shot is ready right when the milk is finished.
6. Basic Latte Art Pouring Technique
You do not need complex rosettas on day one. Start with the fundamentals that build control: centered white dot, simple heart, and then a basic tulip.

General pouring rules
- Hold the cup in one hand at a slight angle.
- Start pouring from higher up in a thin stream to mix milk and espresso.
- As the cup fills to about half, lower the pitcher closer to the surface.
- Increase flow slightly to let the white foam sit on top of the crema.
How to pour a basic heart
- Start with a thin stream in the center to mix milk and espresso.
- Lower the pitcher and pour into one point until a white circle appears.
- When the cup is nearly full, gently move the stream forward through the circle to pull it into a heart shape.
Progressing to tulips and rosettas
Once you can reliably pour circles and hearts, you can stack them for a tulip or use a gentle side-to-side motion while pouring to build a rosetta. The underlying skills are the same: stable flow, correct height, and controlled wrist movement.
7. Practice Routine for Faster Progress
Latte art improves with repetition. You do not need to waste expensive beans and milk every time you practice.
- Use cheap beans or older coffee for practice shots.
- Practice steaming with milk and a small amount of cold water when testing a new machine.
- Set a timer for 10–15 minutes and repeat the same pattern (e.g., only hearts).
- Record short videos of your pour to analyze height, speed, and hand position.
Consistency matters more than long sessions. Short, daily practice builds muscle memory far better than occasional long attempts.
8. Hygiene and Steam Wand Maintenance
Milk residue burns onto the wand very quickly and can clog internal parts. Good hygiene protects both your drinks and your machine.
- Always purge the wand before and after steaming.
- Wipe immediately with a damp cloth; never let milk dry on the metal.
- Inspect the steam tip regularly and clean blocked holes with a pin if needed.
- Follow your machine’s manual for deeper cleaning cycles if available.
Final Thoughts: Focus on Texture First, Art Second
Many beginners chase complex latte art patterns before they can steam good milk. In reality, almost all café-level art is built on one foundation: glossy, velvety microfoam at the right temperature.
Start by mastering consistent steaming on your home machine. Once you can produce smooth, paint-like milk every time, the visual part becomes much easier. With regular practice, you will quickly move from random white blobs to recognizable hearts, tulips, and rosettas — and your drinks will taste better at every step.